Monday, October 25, 2010

JBPM Workflow in Alfresco Share 3.4a community release

There's some interesting improvements available for Workflow in the Alfresco 3.4a Share community release.  Alfresco community downloads are available here.  


Gavin Cornwell from Alfresco has updated the Alfresco wiki with information about 3.4 Share workflow.

Starting a Workflow in Share
Workflows can be started by clicking on the "Start Workflow" action links from either the document details page, from the actions along the right on an item row in the list of Document Library items, or from the select items menu which applies to all items selected in the Document Library page.


After clicking on that, the start-workflow page comes up.  It's a little bit sparse.  The main element is a button that lets you choose which workflow to assign from a popup list of all available Workflows that can be initiated.


The available workflows are those that have been registered with the JBPM engine.  The Alfresco wiki outlines the steps for adding a new custom workflow.  Once added, the new workflow automatically becomes available in this dropdown.  Prior to release 3.4 in Share, the workflow items that could be assigned in Share were hardcoded.


In the screenshot above we can see the new "Custom Lifecycle Review" workflow added using the code from the Alfresco wiki.


As an aside: The server-side Javascript file tomcat\webapps\share\WEB-INF\classes\site-webscripts\org\alfresco\components\workflow\workflow.lib.js that contains the code used on this page to query out the available workflows (getWorkflowDefinitions).


The list of scripts displayed are determined for the dropdown menu from the webscript:
http://localhost:8080/alfresco/service/api/workflow-definitions
Workflows can be filtered out from this list, for example, if you don't want to see WCM workflows.  These workflows are identified by the tag <hidden-workflows> in the tomcat\webapps\share\WEB-INF\classes\alfresco\share-config.xml file, and also in the wcmquickstart-share-config.xml file in that same directory.

Form for Starting and Assigning a Workflow


After you select one of the workflows in the list, the form to enter the parameters that define the workflow is displayed.  I didn't expect to see too much when I selected the new Custom Lifecycle workflow since I had not defined a form for it, but it wasn't too bad.  The layout wasn't great, but everything seemed to work OK, and assigning the workflow worked too.


We can customize the look of this form easily.  For example, by adding the following code to the tomcat\shared\classes\alfresco\web-extensions\share-config-custom.xml file, the layout can be changed.  (The file tomcat\shared\classes\alfresco\web-extension\share-config-custom.xml defined where form definitions and overrides can be placed.)

The important thing here is to match the name of the workflow correctly in the condition for identifying the form that will be matched to it, like condition="jbpm$wfl:lifecycleapproval" in the example below.

<config condition="jbpm$wfl:lifecycleapproval" evaluator="string-compare">
      <forms>
         <form>
<field-visibility>
               <show id="bpm:workflowDescription">
               <show id="bpm:workflowDueDate">
               <show id="bpm:workflowPriority">
               <show id="bpm:assignee">
               <show id="packageItems">
            </show></show></show></show></show></field-visibility>
            <appearance>
               <set appearance="title" id="" label-id="workflow.set.general">
               <set appearance="" id="info" template="/org/alfresco/components/form/2-column-set.ftl">
               <set appearance="title" id="assignee" label-id="workflow.set.assignee">
               <set appearance="title" id="items" label-id="workflow.set.items">
               
               <field id="bpm:workflowDescription" label-id="workflow.field.message">
                  <control template="/org/alfresco/components/form/controls/textarea.ftl">
                     <control-param name="style">width: 95%</control-param>
                  </control>
               </field>
               <field id="bpm:workflowDueDate" label-id="workflow.field.due" set="info">
               <field id="bpm:workflowPriority" label-id="workflow.field.priority" set="info">
                  <control template="/org/alfresco/components/form/controls/workflow/priority.ftl">
               </control></field>
               <field id="bpm:assignee" label-id="workflow.field.reviewer" set="assignee">
               <field id="packageItems" set="items">
            </field></field></field></set></set></set></set></appearance>
         </form>
</forms>
   </config>

User Task and Started Workflow Lists


The uppermost Share navigation toolbar has been redesigned.  A "More" button is available which now includes links to user areas like "My Profile", "My Sites", and "My Content".  Links to two pages that are new to the 3.4 release are also included in this dropdown list: "My Tasks" and "Workflows I've Started".  We'll talk about these two new features in just a bit.


Also included in this dropdown list are links to administrative functions like "Application" settings, "Groups", "Users", and another new-for-3.4 capability, "Replication Jobs".  These are grouped together in the menu in a category called "Tools".  I think that I would prefer that these administrative tasks be broken out into their own menu, but this layout is still workable given the current set of features in Share.


The "My Tasks" page presents a nice summary of the outstanding tasks for the user.  Filters along the left let you quickly zoom in on a specific set of tasks if there are many in your list.

A similar page exists for the user to see the workflows that they've started.  Unfortunately though, once the 'Task Complete' task is done it is removed from the list.  It would be nice to be able to review the workflows that have completed.


Sunday, July 11, 2010

Inbound Emails with Windows localhost

In May I wrote a brief post that showed how you can post emails to the Alfresco server for automatic capture and upload into a specified Folder.  It's a great way to upload email content into Alfresco without having to bring up the Alfresco client interface.  This is powerful feature that I really like.

A few useful scenarios come to mind with this functionality:
  1. You can compose a new email with information and add attachments that you send to an Alfresco folder.  You don't need to bring up the client and navigate to the correct folder/space.
  2. You receive an email containing important information or attachments and you simply forward the email to the Alfresco folder.
  3. You can just add the target Alfresco folder alias as a cc and capture into Alfresco important emails messages when you send them.  This is a very simple way to capture emails and requires very little overhead time for interacting with the repository.
So I wanted to be able to easily demonstrate this functionality.  My previous post showed how you can setup inbound email on a server exposed on the internet.  In that case I had Alfresco installed on an Amazon EC2 server.  But I wanted to also be able to show this functionality working just on an isolated installation of Alfresco on my laptop.

It's easy to setup and here are some steps in the variation of what I described previously.  With these changes I set up Outlook Express on my Windows machine to be able to send inbound emails to the Alfresco server installed on the same machine.

Step 1  Enable the Alfresco email server to run on port 25.  See step 1 of the previous post.

Step 2  Add localhost.com to the Windows hosts file.
c:\windows\system32\drivers\etc\hosts

127.0.0.1       localhost
127.0.0.1 localhost.com

Step 3  Configure Outlook Express (or other email client)

From the Tools menu, select Accounts...
Select the option to add a new Mail account.


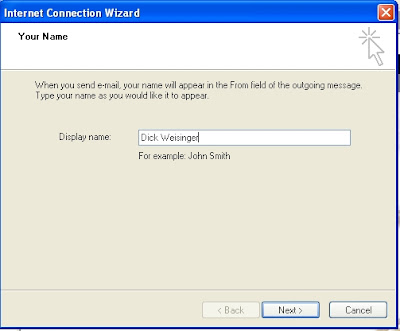
Add the Display Name to use and click Next.


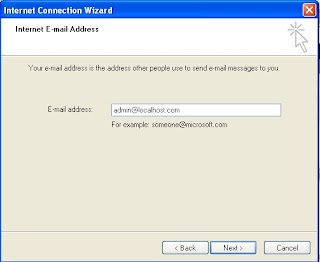
Add the email address.  This address needs to match the email address assigned to an Alfresco user.  In this case, I plan to use this while demonstrating as user admin, so I add the email address admin@localhost.com.


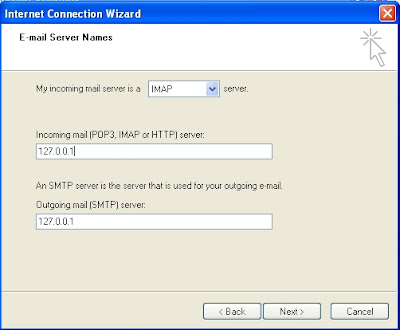
Then configure the Outgoing mail SMTP server to be 127.0.0.1.


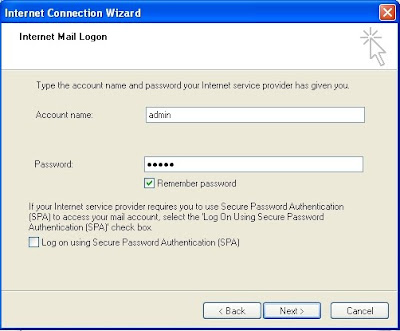
Finally, enter the user name and the password for this account (admin and admin).
And then Finish the wizard.

Step 4  Setup user admin within Alfresco Share


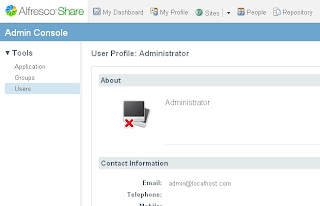
The email address for user admin is set to admin@localhost.com -- which matches what was entered into the Outlook Express configuration.

And the user (admin) as added to the EMAIL_CONTRIBUTORS group.

Step 5  Set up an email alias folder name within Share.

Create and/or navigate to the target email folder within share.  In this case I have a folder named MailFolder within a Share Site documentLibrary area.  Add the Aliasable (Email) aspect to the folder.  Doing that will add a new metadata field that holds the name of the folder alias.
Everything is cool up until this point.  Unfortunately the email alias name field is not exposed from the Share interface.  You'll need to bring up the Alfresco JSF explorer client and navigate to the same space that you just created (or do all of this step in the Explorer client).  There you can enter the alias name for the folder.  In this case we call it 'mailfolder'.  Note that the alias name you choose is case sensitive.

Step 6   Send a Test Email


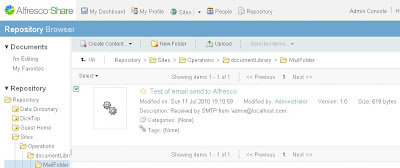
Next to test it, we send an email to mailfolder, the alias name in Alfresco that we just set up.  If we now navigate into the target Share site folder, we can see the document that was just sent.


Wednesday, July 7, 2010

Formtek Hosts Alfresco Lunch and Learn in July

Formtek is hosting an Alfresco Software Lunch & Learn session in our Concord, California (near Oakland) office at 11:30 AM on July 28 to demonstrate how businesses like yours are benefiting from the leading open source enterprise content management (ECM) software solution.

Join us for lunch and sit back and relax while you hear how Alfresco is reducing ECM costs by over 95% compared to proprietary systems like Documentum, Open Text and SharePoint. Alfresco will review in depth how companies are seeing a huge return on their investment with Alfresco's document management, web content management and records management solutions. You will also have the opportunity to view a product demonstration provided by Formtek's Chief Technologist, Dick Weisinger.

This free lunch and learn is an opportunity for you to talk to the Alfresco and Formtek experts and hear first hand about the low cost, simple to use ECM software that thousands of companies are relying on, and saving money with, everyday.

Click here to register for the July 28 event in Concord.

Wednesday, June 9, 2010

Adding new Configurations in the Alfresco Share Admin Console

Alfresco Enterprise 3.3 is out now.  A release called 3.3FCS (First Customer Ship) is available for download now, and another version, and rumor that a 3.3G (community version. G for Google docs) should become available next week.  The Alfresco product feels more stable and complete with every release.  The 3.3 version comes with a lot of new features.  One of those new features is the ability to change the theme of Alfresco directly from the Administration Console.  (You're not able to define the theme via the UI, but you can select from a set of pre-defined themes and then apply them to immediately see their effects.)

The default configuration area available in the Admin Console are Groups, Users, and now with the 3.3 release, the Application (which currently only includes the theme).


From the image above you can see the five out-of-the-box themes that come standard with Alfresco 3.3.  And the image below shows you the rainbow of effects that you can get by applying these themes.


Maybe not too exciting, but one interesting thing about the addition of Themes to the Admin Console is that it serves as a fairly simple example of how the Administration Console was designed to be extensible, so that new components that require administration could be added to the Console.

Surprisingly not that much new code is needed for the addition of themes into the Admin Console.  Let's look at some of the files involved in the rest of this posting.

The files that define the themes can be found at this location:
We're not creating a new theme in this blog, but if you plan to make a custom new one, note that you should start by cloning the files from a theme other than the default one.  The default theme has access to assets that the other themes have local copies of.

webapps\share\WEB-INF\classes\alfresco\messages\slingshot.properties
This file contains the labels used in the left-side navigation area of the Administration Console.  We can see the definition for the label and description of the 'Application' Console configuration (along with similar definitions for users and groups).
## Admin console tools
tool.users.label=Users
tool.users.description=User Management
tool.groups.label=Groups
tool.groups.description=Group Management
tool.application.label=Application
tool.application.description=Application Settings and Management

webapps\share\WEB-INF\classes\alfresco\site-data\themes\default.xml
webapps\share\WEB-INF\classes\alfresco\site-data\themes\greenTheme.xml
webapps\share\WEB-INF\classes\alfresco\site-data\themes\gdocs.xml
webapps\share\WEB-INF\classes\alfresco\site-data\themes\yellowTheme.xml
webapps\share\WEB-INF\classes\alfresco\site-data\themes\hcBlack.xml

These files contain title and description data for each of the themes like this (from default.xml):
<?xml version='1.0' encoding='UTF-8'?>
<theme>
 <title>Default Blue Theme</title>
 <title-id>theme.default</title-id>
</theme>

Files to Render the Admin Console Theme Selector

application.get.desc.xml
<webscript>
  <shortname>Admin Console Application Tool</shortname>
  <description>Administration Console - Application Settings Tool</description>
  <url>/components/console/application</url>
  <family>admin-console</family>
</webscript>

application.get.head.ftl
<#include "../component.head.inc">
<!-- Admin Console Application Tool -->
<@link rel="stylesheet" type="text/css" href="${page.url.context}/components/console/application.css" />
<@script type="text/javascript" src="${page.url.context}/components/console/consoletool.js"></@script>
<@script type="text/javascript" src="${page.url.context}/components/console/application.js"></@script>

These files are included in application.get.head.ftl:
webapps\share\components\console\application.css
webapps\share\components\console\application.js


application.get.html.ftl
This file provides the actual layout markup for the Application Configuration in the Admin Console.
<!--[if IE]>
<iframe id="yui-history-iframe" src="${url.context}/yui/assets/blank.html"></iframe> 
<![endif]-->
<input id="yui-history-field" type="hidden" />

<script type="text/javascript">//<![CDATA[
   new Alfresco.ConsoleApplication("${args.htmlid}").setMessages(${messages});
//]]></script>

<#assign el=args.htmlid>
<div id="${el}-body" class="application">
   
   <!-- Options panel -->
   <div id="${el}-options" class="hidden">
      
      <form id="${el}-options-form" action="${url.context}/service/components/console/application" method="post">
         
         <div class="title">${msg("label.options")}</div>
         
         <div class="row">
            <span class="label">${msg("label.theme")}:</span>
            <div class="flat-button">
               <select id="console-options-theme-menu">
                  <#list themes as t>
                  <option value="${t.id}"<#if t.selected> selected="selected"</#if>>${t.title?html}</option>
                  </#list>
               </select>
            </div>
         </div>
         
         <div class="buttons">
            <button id="${el}-apply-button" name="apply">${msg("button.apply")}</button>
         </div>
      
      </form>
   </div>

</div>

application.get.js
This small server side javascript file  makes use of the Surf/Share sitedata root object that is described here to find the available themes.  The code here finds the available themes and collects and stores them into the model for later display.
function main()
{
   model.themes = [];
   
   // retrieve the available theme objects
   var themes = sitedata.getObjects("theme");
   for (var i=0, t; i<themes.length; i++)
   {
      t = themes[i];
      model.themes.push(
      {
         id: t.id,
         title: t.title,
         // current theme ID is in the default model for a script
         selected: (t.id == theme)
      });
   }
}

main();

application.get.properties
This file defines labels that appear on the Application configuration page.
label.options=Options
label.theme=Theme
button.apply=Apply
message.failure=Failed to apply selected options.


Files to Set the New Theme  

Once the "Apply button is selected, the new theme (and later potentially other Application data) data is posted back to the server.

application.post.desc.xml
<webscript>
  <shortname>Admin Console Application Tool POST</shortname>
  <description>Admin Console Application Tool POST form submission processing</description>
  <format default="json" />
  <url>/components/console/application</url>
</webscript>

application.post.json.ftl
{
   "success": ${success?string},
   "message": "<#if errormsg??>${errormsg}</#if>"
}

application.post.json.js
This function marks the newly selected theme and sets it.
function main()
{
   var themeId = json.get("console-options-theme-menu");
   context.setThemeId(new String(themeId));
   
   // persist across Share application if this is the admin user
   if (user.isAdmin)
   {
      var sc = context.getSiteConfiguration();
      sc.setProperty("theme", themeId);
      sc.save();
   }
   
   model.success = true;
}

main();

Tuesday, May 18, 2010

Wednesday, May 5, 2010

Upload Files to Alfresco via Email -- Inbound Emails

"Data Ingestion"  -- that's the process of getting files and data into your content management system, and Alfresco makes it easy.  My favorite example is being able to drag-and-drop to a mounted Alfresco CIFS drive.  Alfresco 3.2R also introduces drag-and-drop within IMAP-compatible email clients like Outlook, which is pretty slick.

But there's another option that you may not know about that has been part of standard Alfresco for a while and it's something that you may find to be very handy.  That's the uploading of emails sent to an Alfresco email address.  This feature lets users send emails with attachments to Alfresco for archival.  Only emails coming from designated users whose originating email address matches the email address that Alfresco knows from the user profile are accepted.  This is a great option for people out in the field to be able to simply email in data and files that they need to be stored in the Alfresco repository.

You still need to use the Alfresco explorer JSF client to set it up, but once you've got it setup, you can file data into the Records Management module, an Alfresco Share site document library, or anywhere in the repository.

Step 1 -- Setup and Start the Alfresco Email Server
Edit the file Alfresco/tomcat/shared/classes/alfresco-global.properties.  Change the section in the file called "Alfresco Email Server" as show below. Basically, I've uncommented the email.server.* and email.inbound.* properties.  For the variable email.server.domain, I entered the name of the server where Alfresco is running.  In my case, I am testing on an Amazon EC2 instance, so I've entered the Amazon Public DNS for my instance.

In this case, I've set the email.server.port value to 25.  You might want to verify that there is no email server already running on the Alfresco server machine and listening to port 25.

On Linux to check this, I run the following command:
netstat -nap --inet | grep 25

On Windows, you could just run netstat.


After making those changes, I stop and restart the Alfresco server.

# Alfresco Email Service and Email Server
#-------------

# Enable/Disable the inbound email service.  The service could be used by processes other than
# the Email Server (e.g. direct RMI access) so this flag is independent of the Email Service.
#-------------
email.inbound.enabled=true

# Email Server properties 
#-------------
email.server.enabled=true
email.server.port=25
email.server.domain=ec2-184-73-58-194.compute-1.amazonaws.com
email.inbound.unknownUser=anonymous

# A comma separated list of email REGEX patterns of allowed senders.
# If there are any values in the list then all sender email addresses
# must match.  For example:
#   .*\@alfresco\.com, .*\@alfresco\.org
# Allow anyone:
#-------------
email.server.allowed.senders=.*


Step 2 -- Set Alfresco User Emails
Enable Alfresco users to be able to submit email uploads by starting up the Alfresco explorer client and going into the Admin area.  For each user that will be enabled for email submit verify that the email address entered in their Alfresco profiles match the address that they will be using when submitting emails.

Step 3 -- Add Users to the EMAIL_CONTRIBUTORS group
While still in the Alfresco administration area on the Alfresco explorer client, go into group administration.  Make sure that all users that are to be enabled to submit email uploads to Alfresco are part of the Alfresco group EMAIL_CONTRIBUTORS.

Step 3 -- Setup email aliases for Alfresco folders (spaces)
Identify which folders in Alfresco that you'd like users to be able to submit to.  To do that, navigate to each of the target folders in the repository.

For example, here is a new folder in my user home area that is called "Email Inbox"
On examination of the properties for this folder, you can see an entry called "Email ID".  This is really all you need for being able to send emails.  I can do an email upload submit by sending my email to this email address, like:  545@ec2-184-73-58-194.compute-1.amazonaws.com.


But it is somewhat nicer to be able to send to an email address that is easier to remember than just a number.

To create an alias for the Email ID numeric, you need to first add an aspect to the folder.
Run Action -> Add Aspect to Item. Select the "Email alias" aspect.

Once the aspect is added, you'll see something like this.
The property "Email Alias" is now available. By selecting edit for the properties, you can define an alias for the submit email name. For example, I can use 'inbox'. Note that the name you select is case sensitive. After doing that, I can submit emails to populate the folder associated with the alias name, like: inbox@ec2-184-73-58-194.compute-1.amazonaws.com.


Step 4 -- Start sending Emails


Send an email to the Alfresco email server: inbox@ec2-184-73-58-194.compute-1.amazonaws.com, using the name appropriate for your system.
In this case I sent an email and an attachment called 'AlfrescoRMintro.txt'.


Then check the folder.  Both the email body (with name based on the email subject) and attachment have been uploaded to the folder.

Yes, that's really great.  If you look at the property page for this email, you'll see something like this:


There's only one thing that makes it not totally perfect.  On the property page for the email body, you can see the Attachments property with a link to the attachment document.  That's great, but it isn't a live link.  You need to manually go back to the folder level and find the attachment document.  It would nice to just be able to click right there to see the attachment.

Overall though this can be a very useful feature, and one not to forget about.

Saturday, May 1, 2010

Alfresco Records Management Free Trial

With the 3.2r release of Alfresco Share, the Alfresco Records Management module is now available in the Enterprise edition.

Alfresco has recently started a free trial program to get started using Alfresco Share and Records Management.  Click here to sign up for it.

Paul Hampton, Product Manager at Alfresco, has recorded a number of Share Records Management videos. More of them are available on this page. I've included one of the videos below for your viewing interest.

Introduction to Fileplan

This video reviews the Fileplan within the Alfresco Records Management solution. It shows how multiple users will be presented with different views of the Fileplan based on their security setting and role.

Thursday, April 15, 2010

Preview: Alfresco Share Rules

Here's a followup from my previous post that previewed Data Lists in Alfresco Share.

This time I give a demonstration of the rules capability in the Alfresco Share 3.3 Community release. Rules are not new to Alfresco. They've been in the Explorer client for some time. But being able to specify them from Share is new. And the UI for managing them is a nice improvement over the JSF-based screens of Explorer.

While there's a 3.3 release downloadable now, as of this writing, bug fixes for rules in Share seems to be quite active. What I show here was made with a build from the latest source code in the SVN Head area that I made this morning.


Transcript for the video can be downloaded here.
A high resolution version of this demonstration can be seen here.
The Alfresco 3.3 Community release can be downloaded here.

The Alfresco Share 3.3 version is certainly shaping up. And the new rules capability in it really add to the usability of the product.

Tuesday, April 13, 2010

Preview: Alfresco Share Data Lists

If you don't have the time to download and setup the newly released Alfresco Share 3.3 Community version, here's a video that previews one of the new features in that release: Data Lists.


Transcript for the video can be downloaded here.
A high resolution version of this demonstration can be seen here.
The Alfresco 3.3 Community release can be downloaded here.


The video doesn't get into how the lists are defined using the Alfresco Content model. It's possible to create new Data List types or to modify the columns of the existing To Do List.

The To-Do List example that ships with Alfresco Share is shown in the video and the content model definition can be found in a file in the Alfresco war under models called datalistModel.xml.

<type name="dl:todoList">
         <title>To Do List</title>
         <parent>dl:dataListItem</parent>
         <properties>
            <property name="dl:todoTitle">
               <title>Title</title>
               <type>d:text</type>
               <mandatory>true</mandatory>
            </property>
            <property name="dl:todoDueDate">
               <title>Due Date</title>
               <type>d:datetime</type>
               <mandatory>false</mandatory>
            </property>
            <property name="dl:todoPriority">
               <title>Priority</title>
               <type>d:int</type>
               <mandatory>false</mandatory>
            </property>
            <property name="dl:todoNotes">
               <title>Notes</title>
               <type>d:text</type>
               <mandatory>false</mandatory>
            </property>
         </properties>
         <associations>
            <association name="dl:assignee">
               <title>Assignee</title>
               <source>
                  <mandatory>false</mandatory>
                  <many>true</many>
               </source>
               <target>
                  <class>cm:person</class>
                  <mandatory>false</mandatory>
                  <many>false</many>
               </target>
            </association>
            <association name="dl:attachments">
               <title>Attachments</title>
               <source>
                  <mandatory>false</mandatory>
                  <many>true</many>
               </source>
               <target>
                  <class>cm:cmobject</class>
                  <mandatory>false</mandatory>
                  <many>true</many>
               </target>
            </association>
         </associations>
      </type>

The to-do list form is defined in the file share-form-config.xml:
<!-- dl:todoList type -->
   <config evaluator="model-type" condition="dl:todoList">
      <forms>
         <!-- Create item form -->
         <form>
            <field-visibility>
               <show id="dl:todoTitle" />
               <show id="dl:todoDueDate" />
               <show id="dl:todoPriority" />
               <show id="dl:todoNotes" />
               <show id="dl:assignee" />
               <show id="dl:attachments" />
            </field-visibility>
            <create-form template="../data-lists/forms/row-new.ftl" />
            <appearance>
               <field id="dl:todoNotes">
                  <control template="/org/alfresco/components/form/controls/textarea.ftl" />
               </field>
            </appearance>
         </form>

         <!-- Data Grid view -->
         <form id="datagrid">
            <field-visibility>
               <show id="dl:todoTitle" />
               <show id="dl:todoDueDate" />
               <show id="dl:todoPriority" />
               <show id="dl:assignee" />
               <show id="dl:attachments" />
            </field-visibility>
         </form>
      </forms>
   </config>

   <!-- dl_todoList type (existing nodes) -->
   <config evaluator="node-type" condition="dl:todoList">
      <forms>
         <!-- Data List pop-up edit form -->
         <form>
            <field-visibility>
               <show id="dl:todoTitle" />
               <show id="dl:todoDueDate" />
               <show id="dl:todoPriority" />
               <show id="dl:todoNotes" />
               <show id="dl:assignee" />
               <show id="dl:attachments" />
            </field-visibility>
            <edit-form template="../data-lists/forms/row-edit.ftl" />
            <appearance>
               <field id="dl:todoNotes">
                  <control template="/org/alfresco/components/form/controls/textarea.ftl" />
               </field>
            </appearance>
         </form>
      </forms>
   </config>

Tuesday, April 6, 2010

Alfresco Records Management Demonstration

April has traditionally been celebrated as Records and Information Management Month (RIMM). So no better time than to give a look at Alfresco's recently released Records Management module. Alfresco Records Management is certified for the DoD 5015.2 Standard. Below is a video with an overview of the RM module as used in Alfresco Share.


Note: A high-resolution (1504x738) version of this video can be viewed here.
A slightly bigger version of the video (640x379) can be seen here.
A complete transcript of this video can be downloaded here.


More Information

  • A 20-page White Paper describing Records Management Best Practices can be downloaded here.
  • The Alfresco Share Records Management Data Sheet can be downloaded here.
  • The Formtek Web Site.
  • The Alfresco Web Site.

Thursday, March 25, 2010

Reviving Alfresco Share Thumbnail and Avatar Images

One great thing about Alfresco Share is (was) the ability to automatically create thumbnails for documents on upload.  Being able to visually browse your documents before opening them is a feature that many people like.  It can help you locate the document more quickly and helps to distinguish document contents in the case where documents are similarly named.

The problem is that on Windows in Alfresco Enterprise 3.2r, this feature broke.  On upload of a document, Alfresco tries to generate the thumbnail for the image content, but fails and instead creates a zero-byte thumbnail file.

You'll see something like this.

The default picture of a pair of gears displays whenever Share doesn't have a valid thumbnail file to display.

Searching in the forums for a possible solution, I came across one posted by Nicola Prando.  The bug and solution are also posted as ALF-1978.  Thanks Nicola!

The trick to fix this is to define a base directory for ImageMagick to use on Windows.  You can find the following file:
C:\Alfresco\tomcat\webapps\alfresco\WEB-INF\classes\alfresco\subsystems\thirdparty\default\imagemagick-transform-context.xml

You need to add the following lines to the property processProperties for the bean transformer.ImageMagick.Command:

<entry key="SYSTEMROOT"> 
       <value>C:/WINDOWS</value> 
    </entry>

But it isn't good practice to modify a file in the core Alfresco directory.  Instead define a new imagemagick-transform-context.xml file and place here:
C:\Alfresco\tomcat\webapps\alfresco\WEB-INF\classes\alfresco\extension\imagemagick-transform-context.xml

The contents of the file with this change looks like:

<?xml version='1.0' encoding='UTF-8'?>
<!DOCTYPE beans PUBLIC '-//SPRING//DTD BEAN//EN' 'http://www.springframework.org/dtd/spring-beans.dtd'>
<beans>

   <bean id="transformer.worker.ImageMagick" class="org.alfresco.repo.content.transform.magick.ImageMagickContentTransformerWorker">
      <property name="mimetypeService">
         <ref bean="mimetypeService" />
      </property>
      <property name="executer">
         <bean name="transformer.ImageMagick.Command" class="org.alfresco.util.exec.RuntimeExec">
            <property name="commandsAndArguments">
               <map>
                  <entry key=".*">
                     <list>
                        <value>${img.exe}</value>
                        <value>${source}</value>
                        <value>SPLIT:${options}</value>
                        <value>${target}</value>
                     </list>
                  </entry>
               </map>
            </property>
            <property name="processProperties"> 
               <map>
                  <entry key="MAGICK_HOME">
                     <value>${img.root}</value>
                  </entry>
                  <entry key="DYLD_LIBRARY_PATH">
                     <value>${img.dyn}</value>
                  </entry>
                  <entry key="LD_LIBRARY_PATH">
                     <value>${img.dyn}</value>
                  </entry>
    <entry key="SYSTEMROOT"> 
                     <value>C:/WINDOWS</value> 
                  </entry>
               </map>
            </property>
            <property name="defaultProperties">
               <props>
                  <prop key="options"></prop>
               </props>
            </property>
         </bean>
      </property>
      <property name="checkCommand">
         <bean name="transformer.ImageMagick.CheckCommand" class="org.alfresco.util.exec.RuntimeExec">
            <property name="commandsAndArguments">
               <map>
                  <entry key=".*">
                     <list>
                        <value>${img.exe}</value>
                        <value>-version</value>
                     </list>
                  </entry>
               </map>
            </property>
         </bean>
      </property>
   </bean>

</beans>

After doing that, thumbnails will get correctly created.

Another tip, if you should ever need to debug Alfresco thumbnail creation, add the following lines to your log4j file to get debug information:
C:\Alfresco\tomcat\webapps\alfresco\WEB-INF\classes\log4j.properties

log4j.logger.org.alfresco.repo.content.transform=debug
log4j.logger.org.alfresco.repo.thumbnail.ThumbnailServiceImpl=debug

Friday, March 19, 2010

Alfresco 3.3 in the Making

About a month has passed since the Alfresco Enterprise 3.2r release.  The Alfresco development team is now in heads-down development, working on release 3.3.  The roadmap for the 3.3 release is posted on the Alfresco wiki and the next upcoming release, version 3.3, is scheduled for Q2 2010.

Out of curiosity, I thought that I'd check in with the latest Alfresco SVN HEAD source code to see some of the things that are brewing for the 3.3 release.  There are at least three areas that are showing interesting development, and I'll mention them here.

I did run across some problems, but then this code is far from a release date of a few months from now.

Themes for Share

The Admin Console of Share has been enhanced to include a new Tool plugin called "Application".  It looks like a place where overall Share configuration will be done via the UI.  The only thing there right now is the ability to select the Alfresco Share Theme.  Have a look at the "High Contrast Theme":


And here is what the Dashboard looks like after the "Yellow Theme" is applied:


Space Rules in Share

The Alfresco 3.3 Roadmap mentions enhancements in Share around Space Rules:

      Rule and Action Management
          
Linked Rules allowing rules to reused across multiple space
           - Compensating actions triggered on main action failure


Now when looking at the Actions available for a Folder/Space within Share, you see the following options.  Here I compare how the Folder Actions options have changed.

Folder Actions in 3.2r
Folder Actions in 3.3 pre-release

After clicking on "Manage Rules", you'll see the following:


On click of "Create Rule" you get a single screen for defining the new rule.  Unlike the wizard of Alfresco explorer, it's all in one place.  The "Link to Rule Set" will let you define libraries of reusable rules.


I think I prefer this consolidated view to defining a rule compared to the explorer wizard interface.  And it looks like a lot of the new rules functionality for Share is already working.  As shown above, I tried creating a rule on a space that adds the Taggable Aspect to incoming items to the folder.  Most of the UI is working pretty well.  The rule itself though didn't seem to get run when I later added content to the folder, and subsequent clicks on "Manage Rules" for the folder threw some errors.

I also experimented by creating a rule that would assign a simple workflow to incoming items of the folder.  I selected the Review and Approve Workflow with the option of moving the document to a different folder after approval.  I liked the interface for specifying the workflow, but this threw an error too.  It was interesting, although maybe not unexpected, that the error was one that shows the Surf logo.  That's the first time I've seen that in Share.


Alfresco Web Editor (AWE)

Alfresco's Ben Hagan has written a Blog entry explaining how to build and test the new Alfresco Web Editor (AWE).  This is the Web Editor that will be used in future releases of Alfresco WCM.

It all worked for me as described in Ben's blog, and it looks like it has good potential.  It looks a bit early though to start building anything out with it just yet.  But to already have something up and running is a good sign that there will probably be rapid progress on this front.

Monday, March 15, 2010

Smart Record Filing with Alfresco Share

Suppose you are using Alfresco with Records Management and you'd like to simplify the task of filing documents within the Records Management File Plan. That way documents filed by any user could be easily and automatically moved to the right spot within the File Plan.  (Or in a similar scenario where document filing is needed outside of the Records Management world.)

Consider a scenario that uses an Advanced workflow for document approval.  As the final step of the process, the document is accepted or rejected.  If accepted, we want to file the document correctly within the File Plan. And we'd like to be able to do it in a way that the user needn't have to know anything about the File Plan hierarchy.  Just hit "accept" and they're done.

One way to do that is to identify something about the document attributes that can be used to trigger off of for where to file the document.  To keep things simple, let's consider the case where we trigger off of some text appearing within the name of the document.

Suppose the following three File Plan paths exist:
        Legal/Contracts/City Sewer
        Legal/Shareholder/2009Q3-public
        Legal/Corporate/2009Q3-10Q

Depending on whether the following key words are contained in the document name string, the document will be moved to the appropriate folder: "Sewer", "Shareholder", "Corporate".

We can write some server-side Javascript that will then process the file correctly.

Consider this code snippet:

// Define mapping pairs
//   [ "String to search", "Alfresco space to map to" ]
var remap = [ ["Sewer", "Sites/rm/documentLibrary/Legal/Contracts/City Sewer"],
              ["Shareholder", "Sites/rm/documentLibrary/Legal/Shareholder/2009Q3-public"],
              ["Corporate", "Sites/rm/documentLibrary/Legal/Corporate/2009Q3-10Q"] ];
              
// Get the Name of the document
var docName = document.properties.name;

for( m in remap )
{
    var check = remap[m];
    if( docName.search( check[0] ) > -1 )
    {
       // Found a match.  String contained in document name
       var destSpace = companyhome.childByNamePath( check[1] );
       
       // Move the document to the right Alfresco space
       document.move(destSpace);
    }
}

This code could be embedded within the approval workflow process definition file. Or it could be extracted out into an external script. For example, the workflow might simply move the file to an "approve" folder and that folder could have an Alfresco rule assigned to it that executes the Javascript for filing. In that case, if the identification fails, the document stays in the "approve" folder and must be manually identified and filed.

The Javascript code defines an array of filing rules that specify which folder to move the document to depending on a match on part of the document name.